Showing posts with label dessert. Show all posts

Saturday, 11 March 2017

Baked Gujiya

With Holi just around the corner, it was an easy decision to make this all time favourite festival treat-only this time I tried a baked version , which turned out just as delicious. Most traditional recipes use mawa/khoya in the filling, which I skip for a lower calorie version. The filling is a simple coconut powder and sugar mixture. I personally like the dry gujiya instead of the sugar syrup soaked one- easier to make and store as well. Try this recipe for a healthy and easy favourite


Ingredients (makes 16)

For the dough
2 cups maida
3 tablespoons ghee
pinch of salt
2/3 cup water

For the filling
1 cup powdered sugar
1 cup dessicated coconut/coconut powder
3 tablespoons sooji
2 tablespoons ghee
1/2 teaspoon elaichi powder
2 tablespoons chironji seeds
1/4 cup raisins

1. Preheat oven to 200 degrees
2. For the dough, melt the ghee and add to the maida. Rub the ghee in the maida with the salt , then add the water little at a time - knead into a tight dough (like poori atta) This quantity of water sufficed, still do not add it all together - you do not want a sticky dough
3. Cover the dough and let is rest while the filling is prepared

4. For the filling, heat the ghee,sooji and coconut in a thick bottomed pan. Roast till the mixture is golden brown and then remove from the flame. Let it cool. When cool add all the remaining ingredients
5. Divide the dough into 16 equal portions and make into balls. Roll out each ball into a thin chappati.
Place about 2 tablespoons of the mixture on one half- leaving 1/2cm from the edge of the chappati.
To seal the gujiya, take about one tablespoon of maida and add a little water to make a thick paste - almost like fevicol. Smear this along the bottom half of the chappati, then fold the top half over the mixture and press the edges together. Keeping the folded chappati on the work surface, roll up the edges and seal completely.

6. Line the gujiyas on a baking tray lined with baking paper. Leave an inch between the gujiyas as they will rise during baking
7. Bake for 18-20 minutes on the middle rack till golden brown and crisp on the outside.Remove from the oven
8. When the gujiyas are still hot, brush with a little ghee. I had some of the filling mixture leftover which I brushed over the ghee - to add a sweeter taste to the crust
9. Cool and store.

Happy Holi to everyone !

Sunday, 19 February 2017

Oats and Raisins chocolate cookies

Trying to cut out all forms of wheat flour from my diet, I came across this super easy recipe here .http://www.veganricha.com/2016/11/banana-oatmeal-cookies.html
Adapted it to churn out a batch of delightful cookies, perfect with a Sunday morning cuppa!


Ingredients (makes about ten cookies)

1 ripe banana, mashed
1 cup oats
1/2 cup ground almonds
2 tablespoons honey
2 tablespoons brown sugar
2 tablespoons butter
1/4 tsp baking soda
1/2 tsp baking powder
pinch of salt
2 tablespoons cocoa powder
1 tablespoon cornflour( or maida)
20-25 raisins

1. Preheat oven to 180 degrees
2. This is a one bowl recipes. Just put all the ingredients together in a bowl and mix well untill combined
3. Lightly grease your palms and shape into 2 inch cookies. Place on a butter paper lined tray , about an inch apart

4. Bake on the center rack for 15-20 minutes till cooked and crisp.
5. Cool and store in an airtight container


Friday, 26 August 2016

Black Tea infused Chocolate Pots

Inspired by this recipe http://gourmandeinthekitchen.com/2014/earl-grey-chocolate-pots-de-creme-recipe/ and some wonderful Black Tea from Sri Lanka

Ingredients (makes 8 small ramekins)

1 cup milk (full cream preferably)
1 black tea/earl grey tea bag  
2 large egg yolks
3 Tablespoons powdered sugar
1/8 teaspoon sea salt
120g cooking chocolate (at least 70%), finely chopped
1 teaspoon vanilla essence
Chocolate shavings, to garnish
1. Pre-heat oven to 180 degrees
2. In a pan, bring the milk to a boil and turn off the gas. Turn off the gas and add the tea bag to the milk. Leave for 3-4 minutes till the tea is infused and remove (make sure to squeeze out the tea bag into the milk before removing from the milk)
3. In another bowl beat the sugar and egg yolks for 3-4  minutes till thickened
4. Add the chocolate to the milk and whisk.
5. Add the egg mixture, vanilla essence and salt and whisk all together to get a smooth batter
6. Divide equally among ramekins till the ramekin is filled slightly below the rim (this pudding does not rise much so no worries of batter spilling out ) In case you do not have ramekins use any heavy ceramic baking bowl
7. Line the ramekins in the baking try baking pan. Pour water into the tray so that atleast one fourth of the ramekins are covered with water (depends on the size of the ramekins and the depth of the tray but do not cover more more than half the ramekin height)
8. Bake for 25 minutes
9. Remove from oven and chill for atleast two hours before serving
10. Garnish with chocolate shavings

Saturday, 23 April 2016

Eggless Caramel Bread Pudding

Caramel Custard is a universal favourite,although hard to substitute the taste with an eggless version.
I came across this interesting recipe on http://www.vegrecipesofindia.com/eggless-caramel-bread-pudding-recipe/ . The recipe is beautifully explained with several cooking options. I tried the pressure coooker version and served it cold with icecream. I think this can be tried with one ripe banana mashed and added to the bread mixture for a caramel banana pudding. Or maybe even mango pulp.
Will definitely try my mango version soon. Till then, this is the recipe I followed.


Ingredients (serves 6)

375 ml milk (regular toned milk, the original calls for whole milk)
1 tablespoon cornflour/custard powder
4 tablespoons sugar
6 slices regular brown bread
2 tablespoons butter
1 teaspoon vanilla essence
1/4 cup crushed walnuts

For the caramel
2 tablespoons sugar
1 tablespoon water

1. Powder the bread into crumbs using a dry grinder

2. Mix the milk, sugar and cornflour and bring to a boil in a heavy bottomed pan
3. Add the bread crumbs to the mixture along with the butter,walnuts and the vanilla essence

4. Let this mixture cool. For the caramel ,heat a cake tin on the gas flame with the sugar and water (I used the small cake tin about 5 inches in diameter). Leave the gas on low flame till the sugar turns into caramel. Quickly turn off the gas and swirl the caramel around to cover the sides of the dish

5. Set up your double boiler - could be a cooker with a stand at the bottom to place the cake tin OR
a regular boiling pot with a tight lid. The arrangement should be filled with water just touching the base of your tin which will be placed above a stand ( I used my steel grater as the stand)


6. Cover tight and steam for about twenty minutes. If using a cooker, ensure you remove the whistle before covering the lid
7. When cooked, cool and invert onto a tray
8. Serve with ice cream or caramel sauce .


Saturday, 30 January 2016

Eggless Date and walnut coffee cake

A perfect tea time cake. Adapted this recipe from     http://www.vegrecipesofindia.com/eggless-dates-walnut-coffee-cake
You can vary the recipe by adding in chocolate chips or using Demerara sugar.  This recipe uses equal parts of whole wheat flour and regular flour for a healthier version.

Ingredients
1/2 cup de-seeded dates, grind roughly
1/2 cup crushed walnuts
3/4 cup powdered sugar
2 tsp instant coffee
1 cup warm milk
1 tsp baking powder
1/2 tsp baking soda
1/2 cup vegetable oil
1 cup maida
1 cup atta
1/2 cup water
1 tsp vanilla essence

1.  Soak the dates in the warm milk with the coffee powder stirred in for about half an hour before making the batter
2. Pre heat the oven to 180 degrees Celsius
3 Sieve the flours with the baking powder and baking soda. Mix in the powdered sugar
4. To the milk add the water and oil and whisk together. Add the vanilla essence to the wet mixture
5. Add the wet mixture to the dry mixture and beat with a beater for a few minutes
6  Grease a 6 inch baking dish and line the bottom with parchment paper. Pour in the batter and bake on the center rack for roughly thirty minutes
7. Serve warm. Perfect tea time cake ! 

Sunday, 2 August 2015

Whole Wheat and Oats Eggless Chocolate Cake

Always on the look out for heatlhy and quick recipes, ths recipe from https://calorieculture.wordpress.com/2015/07/13/a-chocoholics-delight-with-good-for-you-ingredients/ was on my must -try list. Took about 5 minutes to whip all the ingredients together and I ended up with a really spongy and nutty flavoured cake. The icing was a complete cheat recipe- I took two gulabjamuns sitting in my fridge, pureed them along with their sugar syrup, added about two spoons of cocoa powder and two spoons of milk, Gave the whole mixture a few seconds of heating to get a smooth rich glaze. Voila !

Ingredients

1 cup whole wheat flour
1/2 cup powdered oats
1/2 cup powdered sugar
2 teaspoons baking powder
1/2 teaspoon baking soda
1/3 cup cocoa powder
pinch of salt

1 1/2 cups milk
1/4 cup oil
1/4 curd (or 1 egg)
1 teaspoon vanilla essence

1. Preheat oven to 180 degrees
2. Mix all the dry ingredients together in a bowl
3. Add the milk to the bowl along with the curd. Whisk in together. Add the oil and the vanilla essence
4. Bake in a greased medium tray on the center rack for about 20-25 minutes till a toothpick comes clean
5. Cool and serve

Monday, 6 July 2015

Flourless Eggless Mango Cake

Had some mango pulp sitting in the fridge when I came across this interesting recipe here http://redchillies.us/2009/04/14/eggless-mango-cake/ The recipe sounded like the cake would end up tasting like halwa but it actually tasted like cake. I would maybe add 2-3 tablespoons of flour (maida) the next time I try it as the cake was very delicate! Do not attempt to cut the cake till it has cooled completely, or cool it in the fridge slightly before cutting it. As the notes say on the original site, the mango pulp should be very thick . If not thick, then leave the cake batter for 15 minutes more so that the sooji soaks up the pulp

Ingredients

1 cup roasted sooji (fine variety)
1 cup thick mango pulp (alphonso or kesar preferably)
1/2 cup(100 gms) melted butter
1/2 cup powdered sugar
1 teaspoon vanilla essence
1 teaspoon baking powder

1. Preheat oven to 180 degrees
2. Cream the butter and sugar till light and creamy (2-3 minutes )
3. Add the sooji and the pulp. Beat to a smooth batter. Leave the batter for ten minutes. If not thick, then leave the cake batter for 15 minutes more so that the sooji soaks up the pulp
4. Add the baking powder and the vanilla essence
5. Line a baking dish with butter paper (I used a 4 X 6 tray) . The dish should be roughly half filled with the batter
6. Bake on the center rack for about 25-30 minutes till the top is slightly brown and a toothpick comes out clean

The cake is very delicate so let it cool completely before cooling ! Serve  with  vanilla ice cream and chopped mango pieces for a refreshing summer dessert


Sunday, 31 May 2015

Brown Rice and banana kheer

A healthier alternative to the regular kheer. The bananas add their own sweetness and reduce the quantity of sugar required. Kheer tastes best cooked in full fat milk but then this would not be a healthier version ;) Use regular or toned milk for a lighter version.

Ingredients (serves 6-8 )

1 cup brown rice
2.5 cups water
1 cup light brown sugar
2 ripe bananas, mashed finely
1/2 cup grated coconut
1 teaspoon elaichi powder
1 litre milk
almond/pistachios , to decorate

1. Soak the rice for ten minutes. Drain the water. In a cooker add the 2.5 cups water and the soaked rice. Place on high flame for on whistle. Reduce the flame to sim for 7-8 minutes. Turn off the gas,open the cooker when the steam is released
2. In a heavy bottomed pan, bring the milk to a boil. Add the cooked rice, mashed bananas and let it boil for two minutes. Then reduce the flame to minimum and let the kheer cook for atleast twenty minutes, the longer the better as the milk then gets thicker like rabdi. Cook till desired consistency
3. Add the sugar, coconut and elaichi and cook for another five minutes. The kheer should be thick and creamy.
4. Serve hot or cold as desired, garnished with grated almonds or pistachios


Sunday, 19 April 2015

Salted Caramel Chocolate Cake

A gooey moist chocolate cake layered with a golden caramel filling and topped with a rich chocolate ganache ! Adapted from http://www.bbcgoodfood.com/recipes/3028685/john-whaites-chocolate-chiffon-cake-with-salted-ca for the frosting recipe. For the cake I made my favourite chocolate banana cake (recipe here - http://sparrow-in-the-kitchen.blogspot.in/2014/05/chocolate-banana-cake.html ) . After making the caramel , take it out in a bowl. Add about 1/3 cup water to the pan and then bring to a slow simmer to dissolve all the left over caramel in the pan. Then use this liquid as the soaking syrup for your cake to make it extra moist


Ingredients

Cake recipe here
http://sparrow-in-the-kitchen.blogspot.in/2014/05/chocolate-banana-cake.html

For the caramel
50 gm butter (at room temperature)
50 gm cooking cream (like Amul)
1/2 cup light brown sugar
1/4 tsp salt

For the chocolate ganache
100 ml cooking cream (like Amul)
125 gms cooking dark chocolate

Few sea salt
1. Make the cake as listed in recipe. Cool and cut in half
2. Meanwhile, to make the caramel. Add the brown sugar and cream in a non stick pan. Stir together and then place the pan on a slow flame gas top. Keep stirring with a wooden spoon till all the sugar dissolves and the sauce is a lovely golden caramel color
3. Add the salt  Lightly whisk the butter and add to the sauce when it is slightly cooler but still warm enough to dissolve the butter
4. To make the ganache, Heat the chocolate in  the microwave on high  for one minute. Add the cream and heat for thirty seconds more. Take out of the microwave and quickly whisk it all together-the chocolate gets darker as you whisk
5. To assemble, place one half of the cake on a tray. Pour half the soaking syrup over it and then almost all the caramel (leave about two tablespoons for the top layer )
6. Place the second half and then pour the remaining soaking syrup and the caramel on the top
7. Place the ganache in a piping bag and pipe curls all over the cake - or you can just pour the ganache over the cake and top with chocolate curls.
8. Chill for a few hours . Just before serving , decorate the top with FEW sea salt crystals


Wednesday, 18 March 2015

Banana Sheera

Sometimes I buy bananas and just let them (over)ripen on the counter so I can try interesting desserts later. The safest of course is the Chocolate Banana cake (found here) This was a first for me at making and eating. Since the bananas I used were very ripe, there was a lovely distinct banana flavour The sooji should be roasted before using to avoid a sticky sheera, roasted sheera is available readymade these days. Try this for a light and sweet finish to any meal.


Ingredients (serves 3-4)

2 medium overripe bananas,mashed roughly
1/2 cups sugar
3/4 cups roasted sooji
1 and 1/2 cups water
Saffron threads
1/2 teaspoon elaichi powder
3 tablespoons ghee

1. In a thick bottomed kadhai, heat the ghee on a slow flame. When hot, add the sooji and roast till it is light brown in colour and you can smell the roasted sooji (about 7-8 minutes) . This should be done over a slow flame.
2. At the same time bring the water to a boil in another pan with the saffron,sugar and elaichi powder.
3. When the sooji is roasted,add the mashed bananas and roast for another two minutes. Then add the hot water (carefully as it will splutter) . Mix everything well together
4. Cover with a lid till the water is absorbed and leave for another 3-4 minutes stirring once or twice in between. The mixture will fluff up and the ghee will come on the sides when it is ready
5. Turn of the gas and serve hot, garnished with almond slivers and raisins


Sunday, 8 June 2014

Tres Leches Cake - Three milk cake

Tres-leches means 3-milks literally, so this is a classic vanilla sponge cake soaked with a 3 milks mixture and served cold. I have friends who swear by the one available at Sancho's, Mumbai and I have been wanting to try this out for a while. This is originally a mexican recipe and there is a slight variation in what people use for the three milks pouring mixture. All recipes use condensed milk(milk no 1) and regular milk (milk no 2). For milk no. 3 most recipes use evaporated milk (which is unavailable in India) If you can source that then just use 1 cup of that for this recipe-. I used 2 cups of whole milk and then reduced it to 1 cup (evaporated the mik on my own :)
You can add a fruit topping or any other decoration - even the cream is optional..the highlight of the cake is the sweet and moist cake with the 3 milk mixture literally oozing out of the cake

For the cake
--------------------------
1/2 can condensed milk
50 ml milk
50 gm butter
3/4 cup maida
1/2 teaspoon baking powder
1/2 teaspoon baking soda
1/2 teaspoon vanilla essence

The 3-milk mixture
-----------------------
1/2 can condensed milk
1 cup milk
2 cups whole milk

2 cups whipped cream


1. Pre-heat the oven to 250 degrees (this will be reduced later)
2. Beat the condensed milk and the butter for 4-5 minutes with an electric beater till light and creamy
3. Next, add in the milk and beat for a minute more
4. Sieve the flour,baking powder and baking soda together and add to the batter
5. Beat on high speed for 4-5 minutes.
6. Pour into a greased tray (I used roughly a 5 inch diameter one) and bake at 180 degrees (reduce the temperature) for about 30 minutes till a toothpick comes out clean
7. Cool the cake
8. For the milk mixture, place the whole milk in a pan and bring to a boil .Then let it sim for about half an hour till the quantity is reduced by half.
9. Cool the milk and mix with the condensed milk and 1 cup of regular milk. You can use a whisk or an electric beater to get a smooth consistency
10. To assemble, slice the cake into half. With a fork, prick the cake all over (carefully)
11. Keep one half on a tray (I usually place buttter paper pieces under the cake which I can remove later so that the tray does not get too messy .The paper should only slightly be under the cake so it is easy to pull out).
12. Pour the milk mixture (about 5-6 tablespoons) over the cake. Add some whipping cream and then place the second half on the cream. Again pour the milk mixture all over the top half - not too much, it might break with the weight and you need some for serving later. Again top with cream and leave the cake in the fridge
13. To serve, slice the cake and pour the remaining milk mixture around each slice. There should be enough liquid around the slice


Saturday, 17 May 2014

Lemon Tiramisu

Lemon Tiramisu

This is a gorgoeus summer dessert. Leave the traditional tiramisu recipe for the not so balmy days and opt for this super fresh lemon based version. Mine is a cheat recipe - minus the mascarpone and the limoncello , actually  makes it lighter and fewer calories to burn off later ! I tried using white rum and lime juice as a substitute for the limoncello, but you can do an alcohol free version. The main taste is of the lemon flavour and that should stand out. Combination of sour and sweet is fantastic. Try this at your next summer dinner !

Ingredients (serves 6-8)

25-30 Sponge fingers (available in speciality stores aka lady fingers/Savoiardi originally in Italian) 

For the soaking syrup

1 cup water
1/2 cup sugar
50 ml limoncello (lemon liquer- I did not have this in stock so I used 50 ml Bacardi limon  and 1/4 cup fresh lime juice -you can opt to use only the lemon juice for an alcohol free version)

For the lemon curd
3 eggs
3/4 cup sugar
50 gms butter
1/4 cup lemon juice(freshly squeezed)
1/2 teaspoon grated lemon rind

3 cups whipped cream

Mint to garnish 

1. For the lemon curd, in a steel bowl placed over a pan of simmering water , whisk together all the ingredients (except the butter and rind). Keep whisking till the mixture begins to thicken (about 10 minutes) and you get a sauce like texture (see pic below). Turn off the gas and whisk in the butter and the rind. Let it cool, covered to prevent a film from forming. If a film forms, then re-whisk till there are no lumps.
2. Meanwhile whip the cream till stiff peaks form. I use Rich's cream (available at stores like Aarif's or other baking ingredients suppliers stores ) It a non dairy cream that is very light in taste and texture- always stocked in my fridge !3. Mix all the ingredients for the soaking syrup.Heat till the sugar dissolves. Cool to room temperature.
4. In a shallow rectangular dish (mine was approx 12 X 5 inches) ,line the bottom with half the sponge fingers after dipping them in the soaking syrup for about 2-3 seconds each. If you dip them longer, they tend to break.You can alternatively layer the fingers and pour the syrup over them.You can make this in individual bowls as well instead of using one serving dish
5. Gently fold in the cooled lemon curd with the whipped cream. Pour half of this custard mixture over the sponge fingers.
6. Repeat with another layer of sponge fingers and then another layer of custard mixture.
7. If any syrup is left, pour that over the top layer of the custard.
8. Garnish with mint leaves.
Chill and serve (preferably the next day!)


Monday, 12 May 2014

Chocolate Banana Cake

My new favourite chocolate cake recipe! Adapted from joyofbaking.com, this one is a must try. I always wanted a recipe that gave this dark dense chocolate colour and this one did . There is no need of a frosting really. Just try it warm and fresh out of the oven.Even the method is so easy - just sift all the dry ingredients together. Mix all the wet ingredients in another bowl and then add the dry to the wet -like a cupcake recipe. The same recipe can be used for cupcakes as well

Ingredients (serves 6 to 8 )
1 cup granulated sugar
1 cup flour
3/4 tsp baking powder
3/4 tsp baking soda
1/2 cup cocoa

1 medium very ripe banana, mashed
1/4 cup oil
1/4 cup milk
1/2 cup warm water
1 teaspoon vanilla essence
1 egg

For the frosting
75 gms butter, at room temperature
1 cup icing sugar
100 gms cooking chocolate (dark preferably)

1. Preheat oven to 180 degrees
2. Powder the sugar. Sieve all the dry ingredients and add the powdered sugar to the mix
3. In another bowl, whisk/beat together all the wet ingredients
4. Combine the wet and dry ingredients, do not overbeat
5. Pour in a greased baking dish (approximately 6 inch diameter) and bake for 30-35 minutes or till a tooth pick comes out clean.
6. For the frosting, melt the chocolate and the butter over a double boiler. Beat in the icing sugar till you get a creamy texture.  .
7. Slice the cake in half - spread half the frosting. Spread remaining frosting over the top.
8. Chill for a few hours before serving. Tastes as good warm with vanilla ice cream..yum!


Wednesday, 23 April 2014

Mango mousse mini cupcakes

King of fruits is in season ! I was actually searching for a recipe for eggless mango mousse and most of the ones I came across simply said to mix whipped cream and mango and that's mango mousse ! So I decided to try two recipes with a single one - cupcakes with mango mousse. Feeling lazy to make the cupcakes, just use this light and delightful frosting over store bought plain vanilla muffins, topped up with fresh mango pieces and you have the perfect summer dessert. Any left over frosting can be piped into shot glasses for mango mousse dessert shots :)

Ingredients (makes 12-15 mini cupcakes)

50 gms butter, at room temperature
1/2 cup flour
1/2 teaspoon baking powder
1 large egg
1/3 cup granulated sugar
1/2 teaspoon vanilla essence
1/4 teaspoon grated lime zest

For the mousse frosting
1 cup heavy whipped cream
Pulp of one mango
Mango pieces, for the garnish

1. Pre-heat the oven to 180 degees Celcius
2. Powder the sugar and beat with the butter till smooth and creamy. Beat in the egg till the mixture is light and fluffy.Add the vanilla essence and the lime zest.
3. With a spoon/spatula fold in all the powders - flour and baking powder . Do not over mix.
4. Line muffin cups/sheet with paper liners and spoon the batter into the moulds till half - full. 
5. Bake on the center rack for 15-18 minutes or till a toothpick comes out clean.
6. When baked, remove from moulds and cool
7. For the frosting, beat the cream till you get stiff peaks ( basically the cream becomes stiff and does not run at all ). Keep in the freezer for 15 minutes
8. Remove the frosting from the freezer and then gently beat in the mango pulp. Pipe onto the cupcakes and chill till ready to serve. Take out from the fridge 15 minutes prior to serving to soften the cupcakes.


Tuesday, 15 April 2014

Nutella filled Chocolate Cupcakes

Who doesn't love Nutella! After trying this flavour  at a baby shower, I could not wait to try these. Although what I had were plain vanilla muffins with Nutella filling, I tried to add to the chocolate flavour with these choco muffins - adapted from a beautiful recipe book gifted from a dear friend. Make these as mini cupcakes and they will soon become your favourite tea time treat


Ingredients (makes 6 medium)

50 gms butter, at room temperature
1/2 cup flour
1/2 teaspoon baking powder
2 tablespoons cocoa
1 large egg
1/3 cup granulated sugar
1/2 teaspoon vanilla essence

Nutella - for the icing (as much as you please)

1. Pre-heat the oven to 180 degees Celcius
2. Powder the sugar and beat with the butter till smooth and creamy. Beat in the egg till the mixture is light and fluffy.Add the vanilla essence.
3. With a spoon/spatula fold in all the powders - cocoa, flour and baking powder . Do not over mix.
4. Line muffin cups with paper liners and spoon the batter into the moulds till half - full. You can make mini cupcakes instead of medium ones (will make around 15 mini cupcakesand baking time will be less)
5. Bake on the center rack for 18-20 minutes or till a toothpick comes out clean.
6. When baked, remove from moulds and cool
7. You can scoop out a little bit of the muffin from the top and fill the empty space with Nutella and then spread more Nutella over the top- or just ice the top with Nutella if you do not want to make a filling of Nutella (but guaranteed that the filling ones taste better :)
8. Serve cold or at room temperature - personally I prefer the room temperature ones.


Monday, 10 February 2014

Eggless Strawberry Swiss Roll

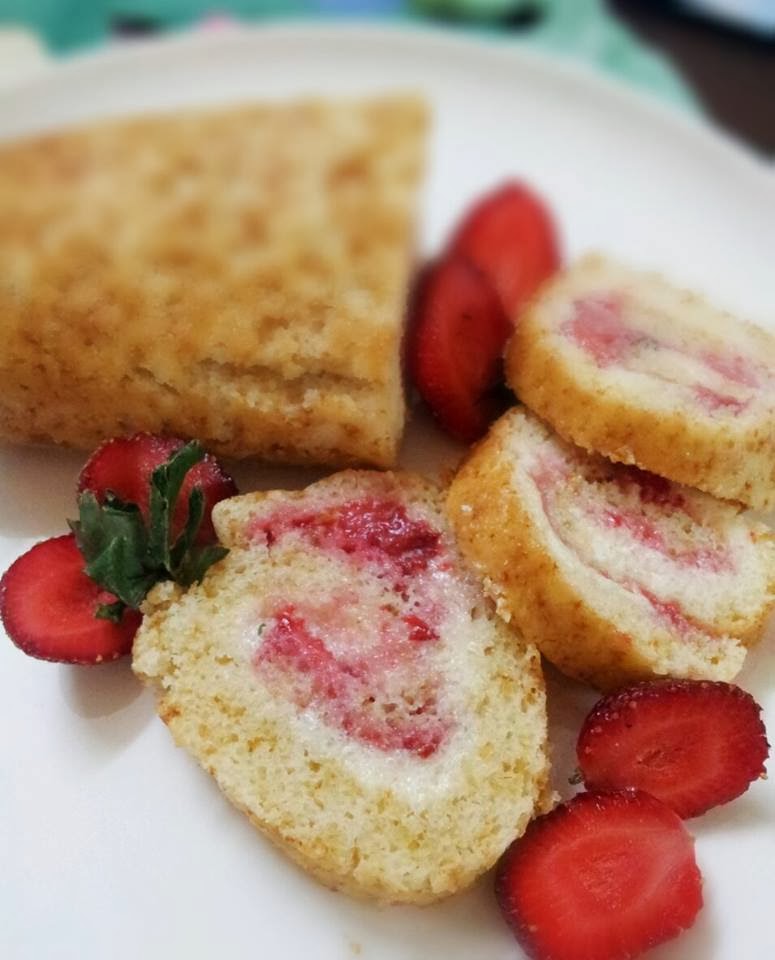
This brings back so many childhood memories - Monginis Swiss Roll for every class picnic I remember ! I have been meaning to try this for a while , was only hesitant due to the skill level involved. I dint get it as perfect as I would have liked to in terms of the rolling part but the taste definitely made up for it. I used fress strawberry puree and buttercream as a filling, you can use strawberry jam and whipped cream as alternatives.

For the cake (makes two 9 inch rolls)
1 cup sugar, powdered
2 cups maida
3/4 tsp baking powder
1 1/2 tsp baking soda
200 ml milk
50 ml oil
2 1/2 tbspn vinegar
1 teaspoon salt
1 teaspoon vanilla essence

For the strawberry sauce
10-12 large ripe strawberries,chopped
2 tablespoons sugar

For the buttercream
75 gms butter
2 cups icing sugar
2-3 tablespoons milk
Grated rind of one small lemon

1. Pre heat oven to 180 deg Celcius
2. For the cake, mix all the dry ingredients together in a bowl and the wet ingredients in a separate bowl.
3. Grease a 9" X 13" reactangular tray and line with butter paper
4. Whisk all the dry and wet ingredients together to get a smooth batter
5. Spread the batter over the tray, it will be a thin layer
6. Bake in the middle rack for about 20 minutes or till toothpick comes out clean and golden brown from the top.
7. Meanwhile cook the strawberries and sugar in a pan over a low flame till the mixture looks like a sauce and the pulp softens, about 5-7 minutes
8. For the butter cream whip all the ingredients together for 8-10 minutes till you get the cream of the desired consistency
9. When I took the cake out of the oven, I found the cake too thick to be rolled. So I sliced it into two halves (after the cake had cooled) and ended up making two rolls! Depending on what tray you have used, the cake should be about a cm thick( even less will do) , so slice off the extra bit. If you don't want to make an extra roll you can use the extra cake for a trifle pudding .
10. Place a butter paper sheet on your cooking slab. Place the cake on it, spread the butter cream over the cake (I used my cream for two rolls) . You can use as much cream as you like but the layer should not be too thick.  Then pour the sauce over the cream, make sure you leave gap on all sides (as I have done in the second picture)
11. Now the tricky part! Gently lift the edge of the cake closest to you and quickly roll the cake with the paper still underneath the cake. Without letting go off the cake, quickly wrap the paper all around the roll- all this has to be done really quick! Its just a one shot quick movement of the hands.
12. Place the roll in the fridge for 4-5 hours atleast so that it is set firmly.
13. When you want to serve, remove the roll from the fridge and cut into slices and serve.


Sunday, 1 December 2013

Cream Cheese Marble Brownies


Brownies with a twist ! Slightly salty-tangy cream cheese layer topping over a regular gooey fudge brownie layer. This recipe is adapted from joyofbaking.com, I reduced the sugar content a slight bit. Serve this warm, with vanilla ice cream.


Ingredients (makes about 8 squares)

Brownie Layer:
75 gms salted butter, cut into pieces
125 grams dark cooking chocolate, coarsely chopped
1 cup granulated white sugar,powdered
1 teaspoon pure vanilla extract
1 large egg
3/4 cup   all purpose flour
 
Cream Cheese Layer:
8 ounces (227 grams) full fat cream cheese, at room temperature
1/3 cup  granulated white sugar,powdered
1/2 teaspoon pure vanilla extract
1 large egg
1/4 teaspoon salt
 
1. Pre-heat the oven to 180 degrees Celsius
2.For the brownie layer- In a double boiler , melt the chocolate and the butter. Whisk the chocolate and butter till smooth. Beat in the egg (no need of an electric beater).
3. Beat the sugar and flour and vanilla essence till all the ingredients come together into a smooth batter.
4. Put all ingredients of the cream cheese layer in a separate bowl and beat all the ingredients together till the batter is smooth
5. Take a greased tray (roughly 6 X 6 inch) , lined with butter paper.
6. Pour the chocolate layer first, over that pour the cream cheese layer. Make swirls with a fork to get a slightly marbled effect
7. Bake on the middle rack till the top layer become slightly brown and a toothpick comes out almost clean ( a few particles should stick to the toothpick), roughly 30 minutes
8. Cool completely. Remove the tray and cut into squares.


Sunday, 15 September 2013

Coconut Cake with Mango Cream Cheese frosting

For all the times I miss mango when the season is over, someone gave me a brilliant idea to freeze fresh mango pulp for such recipes. So next time when the king of fruits is just about to bid farewell for the season, make some fresh mango pulp and freeze it for cheesecakes etc. Mango and coconut is anyway a beautiful combination :)

Ingredients

1/2 tin condensed milk
50 gms butter
50 ml milk
1 cup flour
1 teaspoon vanilla essence
1/2 teaspoon baking powder
1/4 teaspoon baking soda
1/2 cup fresh grated coconut

For the frosting
200 gms cream cheese
1 cup mango pulp
1 cup whipped cream
1/4 cup grated coconut
1/2 cup sugar (adjust more or less as per sweetness of the pulp)

Any fruit juice for soaking the cake

 1. Pre-heat oven to 250 degrees (this temperature will be reduced later)
2. Beat the condensed milk and butter for 3-4 minutes till thick and creamy.
3. Beat in the milk at speed 1.
4. Sieve the flour, baking powder and baking soda together.
5. Add the flour mixture in two parts, beating continuously till folded in. Beat for further two minutes.
6. Add the vanilla essence,coconut. Mix well with the batter.
7. Pour into a 5/6 " diameter tin and place in the oven center rack. Reduce the temperature to 180 degrees C
8. Bake for 25-30 minutes or till a toothpick inserted comes out clean.
9. When done, cool and remove from tray.
10. For the frosting, beat the cream cheese till smooth. Fold in the pulp ,sugar and whipped cream gently.
11. To assemble, cut the cake horizontally in half.
12. Sprinkle fruit juice over each half to soak the cake with the juice, but not oversoak as the cake might break,
13. Sandwich the layers with half the frosting and spread the remaining the frosting over the cake.
14. Chill and serve
 

Saturday, 10 August 2013

Eggless Spiced Pumpkin Muffins

Been wanting to try these for a while. Most recipes with pumpkin use canned pumpkin puree, these are made from fresh puree. I steamed the chopped pumpkin (with the skin on) in a pressure cooker with a steamer basket ,removed the peel and then just blended the pumpkin to get a smooth puree. These are eggless, but you can  add one beaten egg to the batter to make these even fluffier. Great tea time treat! These are without a frosting, but would work great with a cream cheese frosting.

Ingredients (makes 12 regular muffins)

3/4 cup curd
3/4 cup pumpkin (kadoo) puree
1 cup powdered sugar
1 1/2 cups maida
1/2 teaspoon vanilla essence
1 teaspoon ginger paste
1/2 teaspoon cinnamon powder
1/2 teaspoon baking soda
1 1/2 teaspoon baking powder
1/2 cup oil

1. Take about 1 cup roughly chopped pumpkin . Add  2 cups water to a pressure cooker and place the pumpkin in a steamer basket in the cooker. Cover the lid for one whistle, reduce flame to sim for 5 minutes. Once steam is released,open the lid and cool. When cooled, puree in the blender.
2. In a bowl, mix the sugar and curd. Add the baking soda and baking powder and leave for 2 minutes till frothy on the surface.
3. Beat in the oil ,ginger, cinnamon and vanilla essence. Beat in the egg (optional)
4. Add the puree to get a smooth yellowish coloured batter.
5. Fold in the sieved flour, in three portions .
6. Pour evenly into muffin moulds and bake in a pre heated oven at 180 degrees for about 25 minutes or till a toothpick inserted comes out clean.


Thursday, 30 May 2013

Banofee Pudding

Banofee = Banana + Toffee , a classic English dessert. Made originally as a pie, this version of mine just assembles layers in a glass serving bowl. The same can be made the original way, in a pie dish or a springform cake dish. The layers are of a biscuit base, topped with a toffee sauce and then finished off with bananas and whipped cream. I spiked mine with some Irish Bailey's liquor , just to break the slightly over sweet taste of this dish, optional of course. Super easy and loved by all, this one ought to be tried.

Ingredients (serves 8)

For the biscuit layer
200 gms powdered digestive biscuits
80 gms melted butter

For the toffee sauce
1 can (400gms) condensed milk
100 gms salted butter
3/4 cup brown sugar (necessary for the colour)
30 ml Irish Baileys liquor (optional)

For the topping
4-5 ripe bananas
20 ml Irish Baileys liquor (optional)
3 cups whipped cream
Grated dark chocolate (to garnish)

1. I used a rectangular baking glass dish, about 12 X 5 inches. You can make two medium pies if using a 9 inch pie base, divide the ingredients equally.
Mix the butter and the biscuits for the biscuit layer. Spread uniformly over the base of the dish (or along the base and the sides if using a pie dish) and leave to chill while the rest of the ingredients are prepared.
2. For the toffee, melt the butter in a non stick pan and add the brown sugar on a slow flame. Stir till the sugar melts.Pour in the condensed milk and mix well. Boil this liquid for a minute or two till it thickens and the texture appears like toffee (see picture below). Turn off the gas and add the liquor
3. If using a pie dish, carefully separate the pie from the dish and keep on a serving plate (requires some expertise) .Pour the toffee sauce uniformly over the biscuit layer.
4. Next layer the sauce with sliced bananas. Pour the liquor over the bananas and top with the whipped cream.
5. Finally top with grated chocolate. Chill for 4-5 hours before serving