Thursday, 27 November 2014

Moutabal - Roasted eggplant dip

Back from a recent trip to Oman, I would go back there anyday just for the food! I lost count of the number of times that I ate hummus and finally decided to try this dip on the last evening there. Served with absolutely divine Turkish bread, this was as good as hummus- and so easy to make. I read up on a few websites and found that this is different from the Lebanese Baba-ghanoush as that is also made of roasted eggplants but uses chopped onion/tomato etc..


Ingredients (makes 1 medium bowl)


2 medium brinjals/eggplants ( do not take big or overripe ones)
1/2 cup roasted white sesame seeds
3 garlic cloves
1 tablespoon lemon juice
1 tablespoon vinegar
Salt to taste
3 tablespoons olive
Chilli/paprika powder (to garnish)
Extra olive oil (optional,to garnish)


1. Soak the sesame seeds in 1/4 cup water for about 2 hours.
2. Lightly grease the eggplants (you need the round fat dark purple ones) and roast over a medium direct gas flame till the skin is charred all over. Roast on one side and then turn to the other side to roast. When roasted from all sides, leave on a plate to cool
3. Grind the sesame and water into a thick smooth paste.
4. Peel the eggplants with your hands. Do NOT run under water to peel, if the skin is tough to remove then wet your hands slightly and peel off the skin
5. Blend the peeled eggplants with all other ingredients in a food processor (if you want a chunky textured dip) or in a grinder for a smoother texture.
6. Serve this dip cold with pita bread/crackers


Saturday, 8 November 2014

Papad Crusted Stuffed Paneer

Got this recipe from a friend and served it a recent dinner party. It is interesting as the outer coating is of papad crumbs and not bread crumbs. This starter was a big hit ! It is only slightly tricky to handle as the stuffing tends to spill out while dipping in the cornflour/papad. Trick is to be quick and make sure that the cornflour paste is not too runny. The filling can be flavoured as per your choice, you can add herbs/chopped capers/jalapenos etc..

Ingredients

200 gms paneer block

For the stuffing
3/4 cup grated cheese (regular processed cheese)
1/2 cup finely chopped mint leaves
2 chopped green chillies
1 teaspoon ajwain
Salt to taste
1/2 teaspoon chopped garlic

For the cornflour paste
2 tablespoons cornflour
2 tablespoons maida
3/4 cup water

For the papad layer
4-5 regular papads( I used Lijjat Garlic papad)

1. Cut the paneer into one inch cubes. Slice each cube horizontally into two pieces
2. Mix all the ingredients of the stuffing together
3. Place a little amount of the stuffing between the two halves of each cube and sandwich together.
4. Mix all the ingredients together of the cornflour and maida mixture to get a smooth paste
5. Grind the raw papad in a dry blender to get fine crumbs.
6. Hold each paneer cube (with the filling) with your thumb and forefinger and dip into the cornflour paste to coat from all sides . This needs to be done quickly as the filling tends to slip out (might require some practise)
7. Then roll the paneer in the papad crumbs
8. Keep all the coated paneer ready to fry together on a plate
9. Heat oil in a pan for shallow frying. When hot, add the paneer pieces and fry till all sides are browned and crisp.
10. Serve with mint chutney


Sunday, 19 October 2014

Microwave Mysore Pak

Diwali is just around the corner. I have been looking for quick and easy mithai recipes and came across this one from http://www.chitrasfoodbook.com/2014/08/easy-mysore-pak-recipe-3-minutes.html. I was surprised at how easy it was and how great the result was. I have slightly modified the timings and measurements. I used a regular microwave oven (non-convection) on 100 percent power mode which is the default mode of the oven, as in I did not change any setting of the oven.I tried this with a small quantity, can be increased for more quantity - try with these measurements for the first time to get a hang of the process


Ingredients (makes 9 pieces)

1/3 cup besan
1/3 cup regular crystal sugar
1/3 cup melted ghee (measure after melting) + 1 tbsp. ghee
2 tablespoons milk


1. Sieve the besan to remove any lumps into a microwave proof bowl. Add the 1 tbsp. ghee and mix in well (you might get a few lumps after adding ghee, its fine) . Microwave for one minute.
2. Remove , toss the besan around slightly with a spoon and microwave for another minute. (the original recipe roasted the besan only for a minute but I did not get any roasted aroma after the first minute so I have added in another minute )
3.Powder the sugar while the besan is roasting.
4. In another microwave bowl, mix the 1/3 cup ghee, sugar and milk into a smooth mixture. To this add the roasted besan and mix well. Mixture will look like this

5. Microwave this mixture for one minute, it will look like this after that (ghee floating)

6. Remove and stir it well
7. Again microwave for one more minute , you will see a foamy surface as seen in the picture below

8. Remove from microwave. The foam quickly settles and you will see a cratered surface like this

9. Pour into a greased thali or tray and pat with the back of a wooden spoon or a spatula.

10. Let it cool. After 10 minutes while still warm, run a knife through to get the desired pieces. Do not remove till completely cooled

11. When cooled lift each spoon with a flat knife (I used my cake icing knife)
12. Your 4 minute mithai is ready!

Sunday, 5 October 2014

Mooli Saag -Recipe with mooli(radish) leaves

Still some time for the winter veggies to make an appearance as mooli ka saag(leaves) are available in plenty then. These are sold separately and are harvested when the radish is very tender so the taste is not the same as using the leaves on top of full grown moolis.They can be easily confused  with sarson ka saag- they look almost identical, look for the baby moolis at the end of the stalks. If these are not available, make the same recipe with palak or sarson ka saag

Ingredients (serves 4)

2 bunches of mooli ka saag (mooli leaves) - about 2 cups of chopped leaves
2 medium moolis, diced
1/2 cup peas
1 tablespoon mustard oil
1 teaspoon methi seeds
1 teaspoon rai seeds
1 green chilli, finely chopped
1 inch ginger, finely chopped
1 pinch heeng
Salt to taste
1/2 teaspoon haldi
1/2 teaspoon amchoor powder
1/4 cup water

1. Wash the leaves well and chop fine.
2. Heat oil in a pressure cooker.
3. When hot (smoking), reduce the flame and add the heeg, rai and methi seeds. After spluttering for a few seconds add the green chilli  and the ginger.
4. Add the mooli, chopped leaves, salt and the haldi and the water.
5. Close the lid and bring to full flame.
6. After one whistle, simmer for 3-4 mintues and turn the gas off.
7. Srpinkle the amchoor before serving. Tastes great as a side dish with yellow dal and parathas!

Sunday, 10 August 2014

Honey Chilli Potatoes

What's not to love about chinese food , especially this completely Indianised (read non authentic) starter! 
The ones served in restaurants are usually deep fried with a cornflour batter and then tossed about with the sauces. This recipe is super quick and much lower in calories and something I can whip up any time . I use store-bought frozen french fries which I bake in the oven (zero oil) and then toss them with peppers and honey. These can be made with all kinds of peppers, baby corn,sweet corn,mushrooms - just saute whatever vegetable you are using as in step 2. Even the sweetness and chilli can be adjusted as per taste

Ingredients (makes one medium bowl serving)

1 medium packet frozen french fries (about 250 gms)
1 large bell pepper, sliced
1 green chilli, sliced
1 tablespoon honey (add more if you want a sweeter taste)
1 tablespoon soya sauce
1 tablespoon vinegar
1 teaspoon red chilli powder
Salt to tast
1 teaspoon chopped garlic
1 teaspoon chopped ginger
2 tablespoons white sesame seeds
2 tablespoons oil

1. Pre heat oven to 220 degrees. Thaw the fries for 15 minutes before placing in a tray and baking in the oven- wtihout oil, on the top rack . Bake for about 15 minutes or till done, not too brown
2. Heat oil in a wok. Fry the ginger, garlic and green chilli. Saute the peppers on a high flame till slightly soft
3. Add all the remaining ingredients (except the sesame seeds) and toss for a minute
4. Add in the fries and reduce the flame. Mix till the sauce coats everything uniformly
5. Remove onto serving dish and garnish with sesame seeds.
6. Serve immediately  

Friday, 8 August 2014

Churma Recipe

Churma - of Dal Bhaati Churma fame. This recipe is from Tarla Dalal's Rajasthani cookbook with very minor modifications.
It is a very light version of the actual ghee-laden churma I have eaten before. Perfect end to an Indian meal menu. As per the recipe the same can be used for making Churma ladoos, just need to add more ghee for the binding - what's the point I say?;)

Ingredients (makes one medium bowl )
1 cup atta (whole wheat)
1/2 cup sooji
1/2 cup powdered sugar
4 tablespoons ghee plus ghee to fry
1/4 cup powderd almonds/cashewnuts


1. Knead the atta with the melted ghee (4 tablespoons) and little water (approx 1/2 cup added in parts) to get a smooth and
tight dough. It needs to be made with minimum water so add little water at a time .
2. Divide the dough into 8 portions and roll into round pedas.
3. Take each peda, place onto your palm and flatten it tightly between your palm and fingers. The dough should get your finger impressions (see pic 3 below)
4. Heat ghee in a thick bottomed kadhai. When hot, reduce the flame to minimum and add the flattened pedas to fry. Fry on minimum flame till they are medium brown in colour(see pic 2 of fried pedas) -takes about 12-15 minutes per batch.
5. Cool completely
6. Break into rough pieces and add to the grinder. Grind till you get to a coarse powder (not too fine-about the texture of regular sugar)
7. Add the powdered sugar,almonds and elaichi powder.
8. This can be stored in an airtight jar for a few days


Monday, 7 July 2014

Khatha Meetha Stuffed Baingan

Not everyone's favourite vegetable but it is so suprisingly versatile , most people love it in atleat one form. Although my favourite form is still bharta, I can see that this preparation is going to be on a lot of my dinner menus.
Tip 1 - The dish you cook in should be wide enough to accomodate all the brinjals in a single layer so that each gets is fair share on direct heat. If the dish is small and the brinjals are piled on each other , you will not get this taste. Also, I used a non stick cooking pan with a heavy lid to trap the steam and cook the brinjals well. 
Tip 2- Do not toss the brinjals about too much as the stuffing will them come out. Let one side cook till brown and crispy then flip all the brinjals over to cook on the other side. Then you need to flip only once more after adding the imli-jaggery paste.
Serve this with parathas and your favourite dal for a delightful vegetarian meal :)
 
Ingredients
 
10-12 small dark brinjals
 
For the stuffing2 medium onions, finely chopped
1/2 coconut, chopped into small pieces (do not have to be so small as they will be ground later)
2 green elaichis
3 cloves
1 teaspoon jeera
1/2 inch cinnamon stick
1/2 teaspoon chopped garlic
1/2 teaspoon chopped ginger
1 green chilli chopped
1 teaspoon haldi
1 tablespoon dhanya powder
Salt to taste (about 1 1/2 tablespoons)
1 teaspoon red chilli powder
 
3 tablespoons oil
 
Soak together(for atleast 30 minutes before cooking)
1 tablespoon jaggery powder
1/3 cup imli (regular dried imli )
3/4 cup water
 
1. Trim the stems of the brinjals and make four slits (two cuts) in each from the top , taking care not to slit them all the way through. 
2. Heat one tablespoon oil in a non stick pan (read tips on the pan above). Add the jeera,elachi,clove,cinnamon and fry for a few seconds on a medium flame. 
3. Add the ginger,garlic and green chilli and fry for a few seconds more.
4. Add the onions and saute for 5-6 till light brown in colour.
5. Remove all ingreients from the pan. In the same pan add the coconut and fry on medium flame for 2 minutes.
6. Remove and cool
7. Grind all these ingredients with the remaining dry masalas.
9. Stuff each brinjal with this paste.If any paste is left over just spoon it over the brinjal layer once in the pan.
10. Heat the remaining oil. When hot , place each brinjal slowly into the pan and reduce the flame to sim(there should be little oil under each brinjal to make them nice and crisp) Cover the lid . After 7-8 minutes (time depends on the pan and quanity of brinjals), when the sides touching the pan bottom are crisp and brown , flip the brinjals over. Again cover the lid tight and let the other side cook through.
11. When the brinjals are soft to touch (you can check with a knife) and are almost cooked, pour the tamarind-jaggery paste over the brinjals. Cover the lid again
12. After 2-3 minutes again flip the brinjals over and cover the lid. Turn off the gas after 5 minutes. Remove the lid only when you have to serve the dish.


13. Garnish with green chillies/fresh coriander and serve.


Tuesday, 24 June 2014

Vegetables Seekh Kabab

A very healthy vegetarian starter - the aroma and taste of the freshly powdered garam masala is the main attraction of this dish. You can use your own variations for the vegetables - anything will do! Peas/beans/methi/corn/paneer can also be added- to make this a more versatile recipe


Ingredients( makes about 20 medium sized kababs)

For the dry masala powder
2 small elaichis
1/2 inch cinnamon stick
1 tablespoon jeera
2-3 cloves
1/2 tablespoon dhanya powder
1 tablespoon khus khus

4 medium potatoes
3 small carrots,peeled
1 small cauliflower (use as small a flower as possible, else batter will be too wet)
2 green chillies finely chopped
1/4 cup chopped coriander leaves
1 tablespoon ginger garlic paste
15-20 kishmish (raisins)
Salt to taste
1 tablespoon chaat masala
1 tablespoon mustard oil
3-4 tablespoons roasted besan
Cornflour (optional, if additional binding is needed)

Oil for greasing

1. Steam all the vegetable together in a cooker (see pic below). I place all the vegetables in the steamer basket , add 2 cups of water , give one whistle and let the cooker stay on a low flame for ten minutes. Then turn off the gas and open the lid when the steam is released
2. Dry roast all the masalas for the powder . Cool and grind
3. Peel the potatoes and mash all the vegetables. Add all the remaining ingredients and mash thoroughly. If the paste feels too soft/wet , add a little cornflour - else the kababs will fall off the skewers while cooking
 4.If using wooden skewers, soak the skewers 30 minutes prior to using them. This helps soften the wood and the kababs come off easily.
5. Grease the skewers with oil(I use regular sunflower cooking oil) . Grease your palms also lightly. Place the skewer on the palm, take a fist full of the batter and shape the kababs on the skewer- this might require some practice! I do not take too much batter on one skewer as it is easy to shape and does not break either .
6. Place the skewers on the grill/tandoor/oven tray and cook for 10-12 minutes till slightly charred. Grease the tops of the kababs lightly. You can turn the skewers over after 5 minutes. The time will vary on the cooking device being used. If using an oven, set the temperature to maximum.
7. Take the kababs off from the skewers when done and serve with chutney and lemon wedges


Sunday, 8 June 2014

Tres Leches Cake - Three milk cake

Tres-leches means 3-milks literally, so this is a classic vanilla sponge cake soaked with a 3 milks mixture and served cold. I have friends who swear by the one available at Sancho's, Mumbai and I have been wanting to try this out for a while. This is originally a mexican recipe and there is a slight variation in what people use for the three milks pouring mixture. All recipes use condensed milk(milk no 1) and regular milk (milk no 2). For milk no. 3 most recipes use evaporated milk (which is unavailable in India) If you can source that then just use 1 cup of that for this recipe-. I used 2 cups of whole milk and then reduced it to 1 cup (evaporated the mik on my own :)
You can add a fruit topping or any other decoration - even the cream is optional..the highlight of the cake is the sweet and moist cake with the 3 milk mixture literally oozing out of the cake

For the cake
--------------------------
1/2 can condensed milk
50 ml milk
50 gm butter
3/4 cup maida
1/2 teaspoon baking powder
1/2 teaspoon baking soda
1/2 teaspoon vanilla essence

The 3-milk mixture
-----------------------
1/2 can condensed milk
1 cup milk
2 cups whole milk

2 cups whipped cream


1. Pre-heat the oven to 250 degrees (this will be reduced later)
2. Beat the condensed milk and the butter for 4-5 minutes with an electric beater till light and creamy
3. Next, add in the milk and beat for a minute more
4. Sieve the flour,baking powder and baking soda together and add to the batter
5. Beat on high speed for 4-5 minutes.
6. Pour into a greased tray (I used roughly a 5 inch diameter one) and bake at 180 degrees (reduce the temperature) for about 30 minutes till a toothpick comes out clean
7. Cool the cake
8. For the milk mixture, place the whole milk in a pan and bring to a boil .Then let it sim for about half an hour till the quantity is reduced by half.
9. Cool the milk and mix with the condensed milk and 1 cup of regular milk. You can use a whisk or an electric beater to get a smooth consistency
10. To assemble, slice the cake into half. With a fork, prick the cake all over (carefully)
11. Keep one half on a tray (I usually place buttter paper pieces under the cake which I can remove later so that the tray does not get too messy .The paper should only slightly be under the cake so it is easy to pull out).
12. Pour the milk mixture (about 5-6 tablespoons) over the cake. Add some whipping cream and then place the second half on the cream. Again pour the milk mixture all over the top half - not too much, it might break with the weight and you need some for serving later. Again top with cream and leave the cake in the fridge
13. To serve, slice the cake and pour the remaining milk mixture around each slice. There should be enough liquid around the slice


Saturday, 17 May 2014

Lemon Tiramisu

Lemon Tiramisu

This is a gorgoeus summer dessert. Leave the traditional tiramisu recipe for the not so balmy days and opt for this super fresh lemon based version. Mine is a cheat recipe - minus the mascarpone and the limoncello , actually  makes it lighter and fewer calories to burn off later ! I tried using white rum and lime juice as a substitute for the limoncello, but you can do an alcohol free version. The main taste is of the lemon flavour and that should stand out. Combination of sour and sweet is fantastic. Try this at your next summer dinner !

Ingredients (serves 6-8)

25-30 Sponge fingers (available in speciality stores aka lady fingers/Savoiardi originally in Italian) 

For the soaking syrup

1 cup water
1/2 cup sugar
50 ml limoncello (lemon liquer- I did not have this in stock so I used 50 ml Bacardi limon  and 1/4 cup fresh lime juice -you can opt to use only the lemon juice for an alcohol free version)

For the lemon curd
3 eggs
3/4 cup sugar
50 gms butter
1/4 cup lemon juice(freshly squeezed)
1/2 teaspoon grated lemon rind

3 cups whipped cream

Mint to garnish 

1. For the lemon curd, in a steel bowl placed over a pan of simmering water , whisk together all the ingredients (except the butter and rind). Keep whisking till the mixture begins to thicken (about 10 minutes) and you get a sauce like texture (see pic below). Turn off the gas and whisk in the butter and the rind. Let it cool, covered to prevent a film from forming. If a film forms, then re-whisk till there are no lumps.
2. Meanwhile whip the cream till stiff peaks form. I use Rich's cream (available at stores like Aarif's or other baking ingredients suppliers stores ) It a non dairy cream that is very light in taste and texture- always stocked in my fridge !3. Mix all the ingredients for the soaking syrup.Heat till the sugar dissolves. Cool to room temperature.
4. In a shallow rectangular dish (mine was approx 12 X 5 inches) ,line the bottom with half the sponge fingers after dipping them in the soaking syrup for about 2-3 seconds each. If you dip them longer, they tend to break.You can alternatively layer the fingers and pour the syrup over them.You can make this in individual bowls as well instead of using one serving dish
5. Gently fold in the cooled lemon curd with the whipped cream. Pour half of this custard mixture over the sponge fingers.
6. Repeat with another layer of sponge fingers and then another layer of custard mixture.
7. If any syrup is left, pour that over the top layer of the custard.
8. Garnish with mint leaves.
Chill and serve (preferably the next day!)


Monday, 12 May 2014

Chocolate Banana Cake

My new favourite chocolate cake recipe! Adapted from joyofbaking.com, this one is a must try. I always wanted a recipe that gave this dark dense chocolate colour and this one did . There is no need of a frosting really. Just try it warm and fresh out of the oven.Even the method is so easy - just sift all the dry ingredients together. Mix all the wet ingredients in another bowl and then add the dry to the wet -like a cupcake recipe. The same recipe can be used for cupcakes as well

Ingredients (serves 6 to 8 )
1 cup granulated sugar
1 cup flour
3/4 tsp baking powder
3/4 tsp baking soda
1/2 cup cocoa

1 medium very ripe banana, mashed
1/4 cup oil
1/4 cup milk
1/2 cup warm water
1 teaspoon vanilla essence
1 egg

For the frosting
75 gms butter, at room temperature
1 cup icing sugar
100 gms cooking chocolate (dark preferably)

1. Preheat oven to 180 degrees
2. Powder the sugar. Sieve all the dry ingredients and add the powdered sugar to the mix
3. In another bowl, whisk/beat together all the wet ingredients
4. Combine the wet and dry ingredients, do not overbeat
5. Pour in a greased baking dish (approximately 6 inch diameter) and bake for 30-35 minutes or till a tooth pick comes out clean.
6. For the frosting, melt the chocolate and the butter over a double boiler. Beat in the icing sugar till you get a creamy texture.  .
7. Slice the cake in half - spread half the frosting. Spread remaining frosting over the top.
8. Chill for a few hours before serving. Tastes as good warm with vanilla ice cream..yum!


Sunday, 4 May 2014

Watermelon and Feta Salad

There is no recipe for this salad actually :)

All you need is fresh watermelon, cut into any shape you fancy (I used a regular cookie cutter to get these beauties ) Top with crumbled feta cheese/goat's cheese or any salty cheese (white cheese preferably) . For an even lower calorie version, top with crumbled salted paneer.

Garnish with fresh black pepper, oregano (or fresh basil) and a few drops of olive oil.

Try serving it as a cold starter at your next summer bash! Will be an instant favourite with your guests - make it more fun by cutting it different shapes of the watermelon


Saturday, 3 May 2014

Tomato Chutney

I learnt this recipe on a recent holiday to Kerala. This chutney is now a favourite at home with idli/dosa and even parathas. It is also a welcome break from the regular coconut chutney , fewer calories too!

Ingredients (makes one medium bowl serving)

Dry roast mixture
-----------------------
1 cup chana dal (the one used for chutneys )
4-5 dry red chillies
1 tablespoon urad dal
1 teaspoon jeera
1 teaspooon dhanya seeds
1/2 teaspoon methi seeds
1/4 teaspoon heeng powder

1 tablespoon oil
4-5 sambhar onions or 1 medium onion, roughly chopped
3 medium tomatoes, chopped
1 teaspoon chopped garlic
1/4 cup grated coconut
Salt to taste
1 tablespoon tamarind pulp
1/2 teaspoon sugar/jaggery

For the tempering
Curry patta
Rai seeds

1. In a pan, dry roast all the ingredients listed above for the dry roast till the dal turns light brown in color. Then soak this roasted mixture in 1 cup water for 15 minutes.
2. Heat the oil. Fry the garlic and onions till the onion is light brown, Add the tomatoes and cook till the tomatoes are soft. Turn off the gas and cool
3. Grind to a smooth paste with the soaked dal mixture and remaining ingredients. The 1 cup water used for soaking should be enough, add more if needed
4. Serve in a bowl with a tadka of curry patta and rai seeds


Wednesday, 30 April 2014

Caramelised Onion Dip

The crazy summer is here ! Beat the heat with cool summer salads and dips - I am always on the lookout for new dip recipes. A dip is so versatile and can help you whip up a meal so quickly! With pita or as a sandwich filling or a salad dressing, the uses are plenty . This recipe uses cream cheese but you can omit it totally for a lighter version or maybe just add a spoonful of regular cheese spread instead.

Ingredients (make a a medium bowl)
1 cup hung hurd
1/2 cup cream cheese (optional)
1 large onions, finely sliced
1 tablespoon olive oil
1 teaspoon Worcestershire sauce
1/2 teaspoon crushed garlic
1 teaspoon brown sugar
Salt
Pepper
Mint/Coriander leaves (for garnish)

1. Heat the olive oil. Fry the onions on medium heat till dark brown in colour (like the color of onions used for biryani)
2. When brown, add the sugar and fry again for a minute. Turn off the gas and cool.
3. Mix the onions with all other ingredients (save a little for garnish). Garnish with chopped mint and serve chilled.


Wednesday, 23 April 2014

Mango mousse mini cupcakes

King of fruits is in season ! I was actually searching for a recipe for eggless mango mousse and most of the ones I came across simply said to mix whipped cream and mango and that's mango mousse ! So I decided to try two recipes with a single one - cupcakes with mango mousse. Feeling lazy to make the cupcakes, just use this light and delightful frosting over store bought plain vanilla muffins, topped up with fresh mango pieces and you have the perfect summer dessert. Any left over frosting can be piped into shot glasses for mango mousse dessert shots :)

Ingredients (makes 12-15 mini cupcakes)

50 gms butter, at room temperature
1/2 cup flour
1/2 teaspoon baking powder
1 large egg
1/3 cup granulated sugar
1/2 teaspoon vanilla essence
1/4 teaspoon grated lime zest

For the mousse frosting
1 cup heavy whipped cream
Pulp of one mango
Mango pieces, for the garnish

1. Pre-heat the oven to 180 degees Celcius
2. Powder the sugar and beat with the butter till smooth and creamy. Beat in the egg till the mixture is light and fluffy.Add the vanilla essence and the lime zest.
3. With a spoon/spatula fold in all the powders - flour and baking powder . Do not over mix.
4. Line muffin cups/sheet with paper liners and spoon the batter into the moulds till half - full. 
5. Bake on the center rack for 15-18 minutes or till a toothpick comes out clean.
6. When baked, remove from moulds and cool
7. For the frosting, beat the cream till you get stiff peaks ( basically the cream becomes stiff and does not run at all ). Keep in the freezer for 15 minutes
8. Remove the frosting from the freezer and then gently beat in the mango pulp. Pipe onto the cupcakes and chill till ready to serve. Take out from the fridge 15 minutes prior to serving to soften the cupcakes.


Tuesday, 15 April 2014

Nutella filled Chocolate Cupcakes

Who doesn't love Nutella! After trying this flavour  at a baby shower, I could not wait to try these. Although what I had were plain vanilla muffins with Nutella filling, I tried to add to the chocolate flavour with these choco muffins - adapted from a beautiful recipe book gifted from a dear friend. Make these as mini cupcakes and they will soon become your favourite tea time treat


Ingredients (makes 6 medium)

50 gms butter, at room temperature
1/2 cup flour
1/2 teaspoon baking powder
2 tablespoons cocoa
1 large egg
1/3 cup granulated sugar
1/2 teaspoon vanilla essence

Nutella - for the icing (as much as you please)

1. Pre-heat the oven to 180 degees Celcius
2. Powder the sugar and beat with the butter till smooth and creamy. Beat in the egg till the mixture is light and fluffy.Add the vanilla essence.
3. With a spoon/spatula fold in all the powders - cocoa, flour and baking powder . Do not over mix.
4. Line muffin cups with paper liners and spoon the batter into the moulds till half - full. You can make mini cupcakes instead of medium ones (will make around 15 mini cupcakesand baking time will be less)
5. Bake on the center rack for 18-20 minutes or till a toothpick comes out clean.
6. When baked, remove from moulds and cool
7. You can scoop out a little bit of the muffin from the top and fill the empty space with Nutella and then spread more Nutella over the top- or just ice the top with Nutella if you do not want to make a filling of Nutella (but guaranteed that the filling ones taste better :)
8. Serve cold or at room temperature - personally I prefer the room temperature ones.


Thursday, 27 March 2014

Corn Bhel

Such a welcome snack to beat the crazy summer heat ! Packed in with a good deal of healthy stuff too. You can just about anything to this recipe - bell peppers/olives/cucumber . The murmura (puffed rice) is also optional , I just add very little to give it a more authentic bhel taste . Sure to be a party favourite soon.

Ingredients (makes one medium bowl)

2 cups steamed corn
1 small onion, finely chopped
1 boiled potato, chopped
1 green chilli, finely chopped
1/2 cup chopped capsicum
1/2 cup dry bhel mixture (plain murmura OR the packed variety)
Chopped coriander
2-3 tablespoons tamarind chutney (as per taste)
Salt to taste
Lime juice (as per taste)
1/2 teaspoon grated ginger
Sev to garnish

No recipe really- just mix all the ingredients well and serve immediately. You can even add roasted peanuts/chana dal - just about anything !


Tuesday, 18 March 2014

Karela Theplas

Adapted from Tarla Dalal's recipe for diabetics (karela and one of its many health benefits), this is a very healthy breakfast option. It uses the grated skin of karela actually, so the next time you are making stuffed karelas , dont throw the peel away! I used plain atta but you can add nachni/makki/bajra atta also to make this more nutritious

Ingredients (makes 6-8 theplas)

Grated peel of 4-5 karelas,about 3/4 of a cup (use a fine grater to peel the karelas)
2 green chillies, finely chopped
1 teaspoon powdered saunf
1/2 teaspoon haldi
1 teaspoon garlic paste
Salt to taste
1 tablespoon curd
2 tablespoons besan
3 cups atta
1 onion, finely chopped
1 tablespoon oil (I used olive oil)
Water for kneading the dough

Oil for cooking

1. Mix in all the ingredients with the atta and leave for 10-15 minutes
2. Then add the water and knead into a tight dough
3. Divide into small balls and roll out into thin chappatis
4. Cook on a tawa with little oil
5. Serve with curd/chutney - these can be kept in the refrigerator and eaten later (if they last :)


Monday, 3 March 2014

Dahi Bhindi

Kadhi and Bhindi -two of my favourites, combined into one mouth watering recipe. Use tender and small bhindis for this to get the best taste and texture. The bhindis were deep fried, sauteing and adding would not have given the same result. Served with parathas or hot steamed rice, it is a great party idea !

Ingredients (serves 4)

250 gms bhindis , cut into finger sized pieces (wash and pat dry well)
Oil to fry

For tadka
2 tablespoon oil/ghee
1 teaspoon methi seeds
A pinch heeng
1 teaspoon rai seeds
2 dry red chillies
Half inch cinnamon stick
1 teaspoon ginger-garlic paste

To mix together :
2 cups curd
3 cups water
3 tablespoons besan
1 tablespoon haldi

Salt to taste

1. Deep fry the bhindis and keep aside
2. In a deep pan, add the oil for the tadka. Add all the ingredients of the tadka and fry for a minute (you can add the chillies after all other ingredients)
3. Whisk in the curd,water and besan paste (Tip : Dissolve the besan first in about 1/4 cup water to get a sooth paste, then whisk in the remaining water and curd to get a lump free mixture)
4. Bring to a boil and then reduce flame to sim for 20-30 minutes
5. You can adjust the water as per your desired consistency, slightly thinner is better
6. Add salt in the end
7. Add the fried bhindis and serve hot - garnish with extra chillies/ roasted coriander seeds


Wednesday, 26 February 2014

Gooseberry Salsa

My favourite fruit of this season! Packed with Vitamin C and plenty of health benefits, this gooseberry is also known as caped gooseberry for the paperish cape it has as a covering.
Eat it raw or use it in salads or try this fresh and refreshing twist to the regular salsa !


Ingredients (makes one medium sized bowl)

10-12 gooseberries
1 large tomato
1 medium onion, chopped
1 green chilli, chopped
Salt
1 tablespoon white vinegar
1/4 cup coriander leaves
1 tablespoon ketchup
1 teaspoon red chilli powder

1. Preheat oven to 200 degrees Celcius. Slightly prick the gooseberries and place on a baking tray. Bake till the skin starts turning soft and dark brown ,about ten minutes. Similarly roast the tomato.  Cool and peel off the charred skin. Use a wet hand to wipe away any stubborn bits.
2. Repeat the same step with the tomatoes.
3. Chop the gooseberries roughly and tomatoes into chunks and place in the mixer jar with all other ingredients.
4. Grind till you get a smooth but slightly chunky paste..do not grind into a fine paste. You can grind for 2-3 seconds at a time and check till you get the required consistency.
5. Chill and serve with chips/vegetables ..


Monday, 10 February 2014

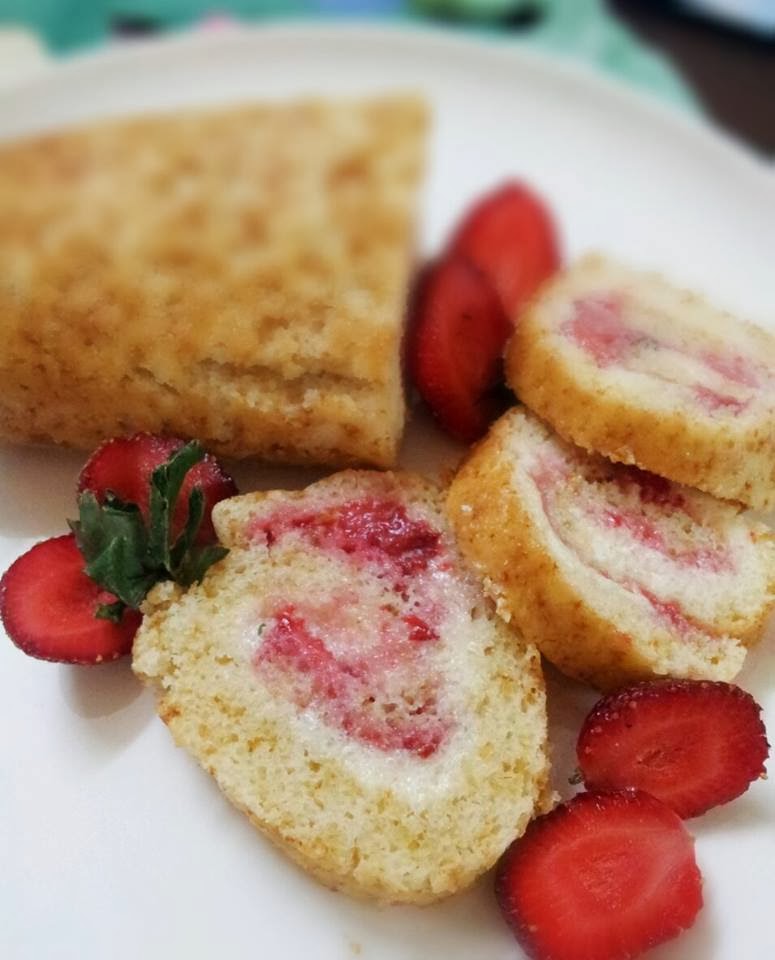
Eggless Strawberry Swiss Roll

This brings back so many childhood memories - Monginis Swiss Roll for every class picnic I remember ! I have been meaning to try this for a while , was only hesitant due to the skill level involved. I dint get it as perfect as I would have liked to in terms of the rolling part but the taste definitely made up for it. I used fress strawberry puree and buttercream as a filling, you can use strawberry jam and whipped cream as alternatives.

For the cake (makes two 9 inch rolls)
1 cup sugar, powdered
2 cups maida
3/4 tsp baking powder
1 1/2 tsp baking soda
200 ml milk
50 ml oil
2 1/2 tbspn vinegar
1 teaspoon salt
1 teaspoon vanilla essence

For the strawberry sauce
10-12 large ripe strawberries,chopped
2 tablespoons sugar

For the buttercream
75 gms butter
2 cups icing sugar
2-3 tablespoons milk
Grated rind of one small lemon

1. Pre heat oven to 180 deg Celcius
2. For the cake, mix all the dry ingredients together in a bowl and the wet ingredients in a separate bowl.
3. Grease a 9" X 13" reactangular tray and line with butter paper
4. Whisk all the dry and wet ingredients together to get a smooth batter
5. Spread the batter over the tray, it will be a thin layer
6. Bake in the middle rack for about 20 minutes or till toothpick comes out clean and golden brown from the top.
7. Meanwhile cook the strawberries and sugar in a pan over a low flame till the mixture looks like a sauce and the pulp softens, about 5-7 minutes
8. For the butter cream whip all the ingredients together for 8-10 minutes till you get the cream of the desired consistency
9. When I took the cake out of the oven, I found the cake too thick to be rolled. So I sliced it into two halves (after the cake had cooled) and ended up making two rolls! Depending on what tray you have used, the cake should be about a cm thick( even less will do) , so slice off the extra bit. If you don't want to make an extra roll you can use the extra cake for a trifle pudding .
10. Place a butter paper sheet on your cooking slab. Place the cake on it, spread the butter cream over the cake (I used my cream for two rolls) . You can use as much cream as you like but the layer should not be too thick.  Then pour the sauce over the cream, make sure you leave gap on all sides (as I have done in the second picture)
11. Now the tricky part! Gently lift the edge of the cake closest to you and quickly roll the cake with the paper still underneath the cake. Without letting go off the cake, quickly wrap the paper all around the roll- all this has to be done really quick! Its just a one shot quick movement of the hands.
12. Place the roll in the fridge for 4-5 hours atleast so that it is set firmly.
13. When you want to serve, remove the roll from the fridge and cut into slices and serve.


Thursday, 6 February 2014

Couscous and Pine Nut Salad Flower Pots

I made this recipe for a baby shower and the salad in little ramekin pots made such a beautiful picture. Couscous is such a versatile and healthy grain. I sourced mine from Dubai, but it is easily available in all major super market stores these days. Just follow the measurement on the pack to cook the couscous. As per the packet I had ratio of couscous was 1:1.2 ,so I took 1 cup couscous and added 1.2 cups of hot water. Cover the mixture for 5 minutes with a tight lid and the couscous soaks up all the water in that much time. Remove the lid and separate the grains gently with a fork, you can add a little olive oil at this point. Couscous can be eaten plain as a healthy substitute for rice with curry dishes too!

Ingredients

For the dressing
2 tablespoons extra virgin olive oil
2 tablespoons balsamic vinegar
1/4 cup chopped oregano (preferably fresh)
1 teaspoon white pepper powder
1 tablespoon honey


For the salad
Approx 2 cups cooked couscous (from 1 cup of raw couscous)
1/2 cup pine nuts
1 cup steamed corn
1/2 cup chopped cherry tomatoes
Salt to taste


Fresh oregano to garnish


1. Mix all the ingredients of the dressing
2. Toss in all other main salad ingredients
3. Serve in ceramic pots with oregano as dressing (as shown in the pic)


Friday, 31 January 2014

Kache kele ke kofte

Some vegetables leave you wondering what one can make with them. Raw banana is one such vegetable for me! It has extensive use in South Indian cooking,this kofta recipe blends both flavours of North and South.

Ingredients For the kofta
3 raw bananas
1 potato
1/2 cup paneer crumbled
2 tablespoons besan
Salt to taste
1 chopped green chilli
1 teaspoon ginger garlic paste

For the gravy
2 tablespoons oil
Pinch heeng
2 onions
1 inch ginger piece
1/2 teaspoon chopped garlic
1 teaspoon red chilli powder
2 teaspoons garam masala powder
1 teaspoon jeera
3 tomatoes
1/2 cup water
Salt to taste

To garnish
Cream optional
Chopped coriander
Kasuri methi

1. Place bananas and potato in a steamer in a pressure cooker
2. Add little water and close the lid
3. Place flame on high for two whistles
4. Sim for 5 minutes after that. Turn off gas
5. Cool and peel bananas and aloo.
6. Mix together all ingredients for the kofta and deep fry till crisp and golden.
Add more besan if needed for binding.
7. For the gravy grind together onion ginger and garlic.
8. Heat oil. Add heeng and jeera. After a few seconds add the onion paste and fry on a medium flame till brown.
9. Puree the tomatoes and add. Keep cooking till the mixture dries and leaves Oil on the sides
10. Add all the masalas and fry for a minute
11. Add the water and bring to boil. Some prefer a slight sweet taste
To kofta gravy for which you can add 2 pinches of sugar
12. Turn off the gas
13. Pour gravy in a bowl. Place koftas in it
14. Garnish as desired
15. Serve hot and let your guests guess what they are being served.